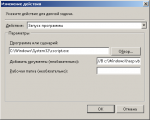
13
January
2023
Updating root certificates on a PC in Windows OS
16:43

Updating root certificates on a PC in Windows OS

13 January 2023 16:43

On Windows 7 - Windows 10, you need to update root certification authorities from time to time.

Note

Root certificates are the supporting pillars for other intermediate certificates of certificate issuing authorities, for certification authorities and, ultimately, for websites. Without them, the chain of trust does not work and https encryption does not work. Due to the need to ensure security, root certificates can only be obtained from trusted sources (you cannot download any files for certificates from Yandex Drive, third-party sites, etc.).

1. Obtaining root certificates from the Windows Update website

There is a utility for downloading root certificates certutil.exe, which needs to be started with the key -generateSSTFromWU and the name of the output file, for example:c:\certs\roots.sst

certutil.exe -generateSSTFromWU c:\certs\roots.sst

Where certs is the directory to be created.

A description of all command keys can be read in the spisok.txt file:
spisok-win1251.txt
spisok-linux.txt

Description of the certutil.exe program key:

-generateSSTFromWU-- Creating SST in Windows Update

Here SST is the current trusted root certification authorities in the SST file type.

Source:updating trusted root certificates in windows 10

Executing a command certutil.exe -generateSSTFromWU c:\certs\roots.sst takes 3-4 minutes:
cert1

2. Export root certificates to p7b file

The resulting SST file can be opened by double-clicking.
cert2
In which you can sort certificates by validity period, select valid certificates and right-click - Export.

2.1 Starting the Certificate Export Wizard:
cert3

2.2 Selecting the output file type. I put an end to p7b - a transport container in which all certificates are in one file (the so-called bundle).

cert4

2.3 Select the output directory and file name with the p7b extension for export

cert5

2.4 Continuation of the wizard - “Next” button
cert6

2.5 Message about successful completion of export: "Export completed successfully."
cert8

3. Import root certificates from the p7b file into the system

3.1 In Explorer, right-click on the resulting p7b file - “Import”
cert9

Enlarged screen fragment:
install_certs

3.2 Starting the Certificate Import Wizard
cert10
Next

3.3 We agree with the automatic selection of storage - further.
cert11

3.4 The last step of the wizard for importing certificates into the system:
cert12

3.5 Message about the completion of importing certificates into the system: “Import completed successfully.”
cert13

Root certificates have been updated.

Note: instead of using the intermediate p7b file method, you can use the certificates snap-in and directly import the SST file:
Run MMC -> add snap-in -> certificates -> computer account> local computer.
Right click Trusted Root Certification Authorities, All Tasks -> Import, locate the SST file
(in the file type select Microsoft Serialized Certificate Store - *.sst) -> Open
-> Place all certificates in the following store -> Trusted Root Certification Authorities.

4. Download and install the root certificate of the Ministry of Digital Development, Communications and Mass Media of the Russian Federation)

4.1 Download the certificate from the website

https://gosuslugi.ru/tls

4.2 Install it in the same way - right-click - install.
To be sure, you can choose where to import - to the "Trusted Root Centers" section.

5. Other sources of certificates - Treasury website

Federal Treasury website:

root certificates

6. Method for obtaining valid and revoked certificates in the form of CAB files

Unpack the file using the 7ZIP archiver (7zip.org), for example, into the C:\PS folder

Installation:

*active root centers- import from file authroot.stl

certutil -enterprise -f -v -AddStore "Root"   "C:\PS\authroot.stl" 

*revoked root centers- import from file disallowedcert.stl

certutil -enterprise -f -v -AddStore disallowed "C:\PS\disallowedcert.stl" 


Related publications