
4
May
2020
Installing, configuring and using WSJTX on Linux
23:19

Installing, configuring and using WSJTX on Linux

4 May 2020 23:19

All hams know about the popular, fast, long-range and cost-effective FT-8 digital mode developed by Joe Taylor K1JT. I work on air in FT8 using the WSJT program under Linux Debian 10 (buster). Installing and configuring WSJTX under Debian Linux is simple and takes a few minutes.

Installation in the terminal - WSJTX version 2.0.0:

su -
apt-get update
apt-get install wsjtx

Setting up WSJTX for Linux: CAT interface

The CAT interface does not work upon first launch. The reason is the user's access rights to the COM port. Permission must be granted to access the serial port tty. Add the user user to the dialout group using the usermod command.

In the terminal:

su -
usermod -a -G dialout user

where 'user' is the name of the user account you are working under.

Exit the superuser shell:

logout

We end the session and log in again: “Start” - “Log out” - “Log out”.

Now you can run the program from a user account:

wsjtx

(or through the "Start" menu - "Audio and Video" - "wsjtx").

Final WSJTX setup:

Menu File - Settings:

*on the bookmark General enter your call sign and QTH locator

  • enable the items “Tx messages to Rx frequency window”, “Monitor returns to last used frequency” and, most importantly, “Double-click on call sets Tx enable”. Basic WSJT-X setup .
  • for weak computers you can check the "Single decode" checkbox.

On the second tab, select your transceiver model and control method:

  • using CAT (computer aided transmission) using CAT commands that the transmitter understands.
  • using VOX (transmitter activation is configured in the radio station menu according to the input sound level)
  • DTR voltage level Data Terminal Ready, high level means readiness for transmission of the RS-232 interface.
  • RTS voltage level is zero relative to ground when the Request To Send signal is sent - a request to transmit the RS-232 interface.

We are interested in the first method - through CAT. The VOX method is less interesting; it can be useful only for systems that do not have a control transmission cable, for example, preliminary, rough.

Lyrical digression

If in WSJT-X in the File - Settings - Radio - Rig menu you look closely at the list of radio station (transceiver) models, you can see the lines "FlRig FlRig" and "HamLib NET rigctl". I did not use these items, and here's why...

There are several ways to programmatically control a transceiver in Linux:

  1. via SERIAL port (tty) using CAT commands directly from the program (here the USB-COM port is occupied by the WSJTX program). This method works reliably. You must select the transceiver model and COM port, set the transmission parameters (number of bits, parity, error checking). The WSJT-X program uses the HamLib library to control the transceiver using CAT commands.
  2. Control of the transceiver through a software layer in the form of a program from the package "flrig"(item "FLRig FLRig") - works partially. I do not recommend this method (at the time of writing this article): only the frequency is transmitted, but PTT via CAT does not work. No solution has been found yet.
    1. The same as point 2, but the linux service is used "rigctld" (more difficult, but you can configure it (see.publication on the ra9mir website)).
  3. Using the utility "rigctl" (item "HamLib NET rigctl") - a program for controlling the transceiver from the command line.

In this article I consider the simplest and most direct method - controlling the transceiver via a USB port, then a USB-COM RS-232 converter like Prolific PL2303 USB-to-Serial-Port together, a control cable Yaesu CT-62. Drivers for the Prolific chip are present in Linux and there is no need to install anything additional; the hardware is correctly detected when the computer starts.

A second COM port for switching transmission (using DTR or RTS signals) is not required in this case. All control using CAT commands and feedback (frequency, mode) go through a single RS232 COM port.


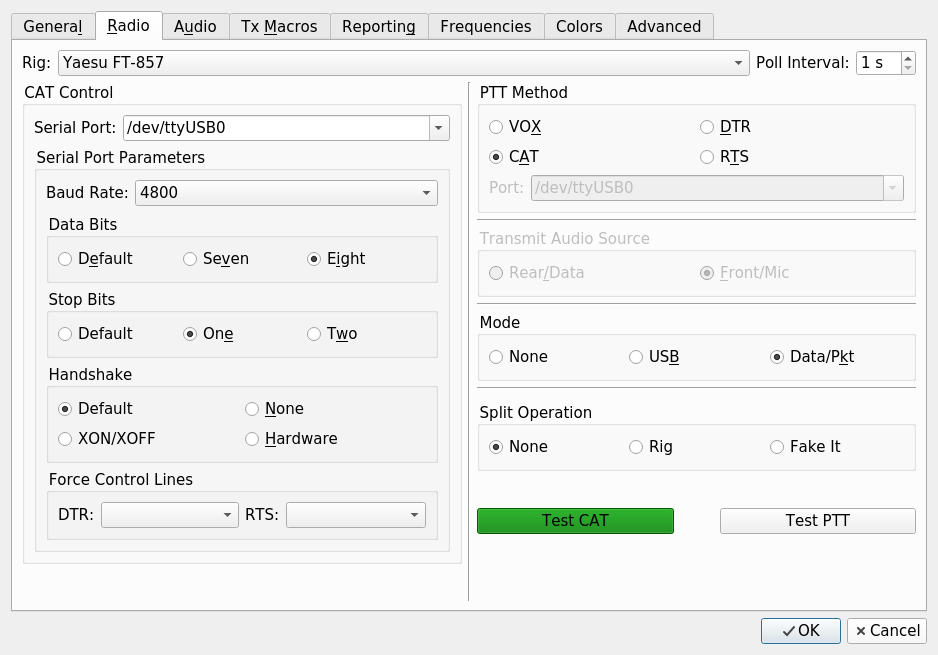
So, on the tab Radio indicate:

  • in the field "Rig" - select the model of the radio station from the list (in my case "Yaesu FT-857")
  • serial port /dev/ttyUSB0,
  • port speed 4800,
  • data bits -eight, stop bits -one, handshake -Default,
  • PTT method -CAT,
  • mode -Data/Pkt(for digital modes, a mode similar to USB is used, but the PTT microphone is disabled),
  • split operation -None.

    CAT setup in WSJT-X
    Press the button "Test CAT" - frequency tuning should work in the transceiver, the mode will switch to DIG and the button will turn green.

Click on "Test PTT " (caution: an antenna of the appropriate range or equivalent must be connected) - the transmission should turn on and the " test PTT " button will turn red. Press the " test PTT" button again, the transmission will stop.

There is no need to configure anything on the "Audio" tab. You can check that the correct sound card is being used - external USB or built-in. I had an external USB sound card connected to my PC and Linux automatically selected it as the main one: WSJT-X settings

On the "Reporting" tab, it is better to enable "Enable PSK Reporter Spotting" to publish decoded call signs on the map https://pskreporter.info/pskmap.html.

At the end of the settings, press the OK button.

All that remains is to select in the "Decode" menu, depending on the performance of the computer, the depth of the search for Decode call signs:

  • Fast (on very slow PCs),
  • Normal (on weak computers) or
  • Deep (for fast processors).

It is not necessary to check the "Enable AP" checkbox for regular radio communications; this mode "a priori" changes the algorithm for a deeper search for call signs based on previous information (an increase in sensitivity of 2-4 dB, but an increase in the likelihood of false decodes). The AP checkbox is relevant for levels below -22 dB or for QRM - intense interference between stations (for example, during a pile-up) while you are hunting for DX. :-)

The WSJTX setup is complete.

Note for Yaesu FT-857/897 users

  • in menu 019 "CAT Rate" set the speed to 4800 (suitable for most interfaces, for example, CT-62)
  • in menu 020 "CAT/Lin/Tun" to assign the function of the CAT connector, select the "CAT" item.
  • in menu 037 "Dig Gain" set first to 1...4, then increase during transmission, observing the ALC indication.
  • in menu 038 "Dig mode" set "User-U". This is an important condition for decoding the FT8/JT-65/JT-9 digit.
  • in menu 039 "Dig Shift" we leave the default value of 0 Hz if the transceiver is fine with frequency accuracy.
  • in menu 040 "Dig VOX" you can set "0", because transmission control is via CAT.
  • in menu 075 "RF Power Set" we set a low power of 20-30 W for digital operation.

When the Internet is connected, we check the deviation of the local clock from the world clock on the website https://time.is/. The time drift should be no more than 0.5 seconds.

You can start broadcasting in FT8!


Features of WSJTX in the Linux operating system

There are few features, because WSJTX cross-platform Linux/Windows program.

  1. If you change your mind about transmitting, interrupt the transmission by pressing the “Halt TX” key at any time.
  2. In rare cases, interruption of transmission by the operator can lead to loss of communication through the CAT interface of the computer with the transceiver (an error occurs). Symptoms: the transceiver is in any mode, transmitting or receiving, and does not respond to commands; a window appears on the screen with a message about loss of connection. Turn off and turn on the transceiver. Click on the error message in the WSJT window "Retry". The connection is being restored.Error window
  3. It is not possible to use OmniRIG, which distributes CAT to several programs simultaneously. There is a similar program flrig from the fldigi package, which performs the function of controlling the transceiver. But WSJTX, when selecting FLRig/Flrig, only partially works with it (the VFO frequency is transmitted, but the transmission leads to an error).
  4. The radio communication log in the form of a text file in ADIF format is stored in a hidden folder by default ~/.local/share/WSJT-X. (To access the log, enable the display of hidden files in the "File Manager" menu - "View" - "Show hidden"). ADIF format communication log text file -wsjtx-log.adi suitable for uploading to the website eQSL.cc.
  5. The default Pulse Audio volume control is at maximum - 100% (can be reduced, it is remembered from session to session). Sound input, that is, recording from the line input - at the 30% position, is not remembered. The solution for adjusting the level at the microphone input is only hardware - a resistive voltage divider. Or you need to manually adjust the levels in pavucontrol ("Start" - "Audio and Video" - "PulseAudio Volume Control") after each launch of the wsjt-x program.

    Optimizing WSJTX 2.0.0 for slow computers:
    For short waves (1.9-29 MHz): Decode - Normal, File - Settings - Advanced - Two pass decoding - OFF
    For ultrashort waves (144 MHz) - additionally File - Settings - General - Single decode - ON.

WSJTX 2.1 User Manual on rfanat.ru

(the difference between versions 2.0 and 2.1 is the presence of FT4 mode):
http://rfanat.ru/s26/wsjt-x_21_serguide_rus.html

Instructions in English for version WSJT-X 2.4.0: PDF

Updating the program to the latest version

In Debian 10 (buster) the latest version is WSJTX 2.1.2

Debian 11 (bullseye) has the latest version of WSJTX 2.3.0 repack 2 (as of the date of writing).

The following steps are only suitable for Linux Debian. This method has also been tested in MX Linux 19.3, which is based on Debian. Connecting the SID repository for other operating systems other than Debian can lead to negative consequences - problems with dependencies.

For other Linux operating systems, see the "Official WSJTX installation method" section below.

  1. Go to the folder

    cd /etc/apt/sources.list.d

  2. Create a new file in the /etc/apt/sources.list.d folder testing.list

    touch testing.list
    sudo nano testing.list

to which we add the line:

deb http://ftp.ru.debian.org/debian/ testing main contrib non-free

Save the file Ctrl+O and close the editor Ctrl+X.

  1. Updating the package cache

    apt-get update

  2. We launch the wsjtx update (other packages with dependencies will also be updated)

    sudo apt-get --only-upgrade install wsjtx

  3. Answer all questions OK

  4. Reboot the computer

  5. Result - everything works, and WSJTX is updated, FT-4 mode is present:
    new WSJTX with FT-4 mode

Note: After adding the debian testing repository (SID), updating the system using apt update will also update other programs. There is nothing bad about this, since testing is a source of stable, but newer versions of Debian programs.


Frequencies FT-8 and FT-4, JT-65A

In order for FT-4 frequencies to appear in the WSJT-X program after updating the version, you need to go to the menu "Settings" - "Frequencies" and right-click, select "Reset".
reset FT-4 frequencies


Update from 07'2021: about versions of WSJT-X in various Linux distributions

Different Linux distributions have different versions of WSJT-X.

https://repology.org/project/wsjtx/versions

ЕщёOne way to update WSJTX is to upgrade to a newer version of Linux, for example, if you have the operating system Ubuntu Linux 20.04 "Focal Fossa", you can switch to a line of distributions with a support cycle of 6 months, that is, upgrade the version to Ubuntu 20.10 "Groovy Gorilla". In this case, WSJT-X will be updated from v. 2.1.2 to v.2.2.2. Next, if you update the Ubuntu 20.10 version to Ubuntu 21.04 "Hirsute Hippo", the WSJT-X version will be updated to v. 2.3.0. Likewise, upgrading from Debian 10 to Debian 11 SID will upgrade the version from 2.0.0 to 2.3.0.

When adding repositories to sources.list or sources.list.d, you must follow the order - connect repositories only for a given distribution (cannot be mixed from different sources). For example, verified repositories for Linux Mint Debian Edition (LMDE 4) are given on the page:
*https://blog.desdelinux.net/en/repositories-for-lmde/

For MX Linux, as written above, the Debian testing repository is suitable, which I personally verified:
*deb http://ftp.ru.debian.org/debian/ testing main contrib non-free
During the update, questions will be asked about replacing configuration files - in most cases, replacement should be skipped (N). When prompted to install GRUB, you should select all disks and volumes that will be offered.
After the update is completed, the WSJTX version will change to 2.3.0 (penultimate, without Q65 mode).

Regarding Linux Mint(not Debian!) It is better to follow the following instructions for upgrading versions:
Linux Mint 19.3 update to version 20.0
Linux Mint 20 and 20.1 upgrade to 20.2

СамThe latest versions of packages are, as usual, contained in the Fedora Linux distribution. For example, WSJT-X 2.4.0. The only “disadvantage” of this OS (it was installed on a laptop) is a large list of changes that had to be downloaded from the network weekly when executing the command dnf upgrade: 500-800 MB of new kernel versions and packages. Therefore, on a desktop PC I chose the Debian distribution as more conservative.

Official way to install WSJTX

The K1JT website offers to download and install the latest version of WSJT-X in the form finished DEB or RPM file:
This method is provided for operating systems that do not have the latest version of WSJT-X in the repositories, and which are not desirable to update to a newer version. Only the WSJT-X package is installed from RPM or DEB,

Official WSJT-X documentation from K1JT

Installing from a redistributable DEB or RPM file makes it impossible to automatically update the program version when you run the command apt update. After the next version is released, you will have to download it manually from the Joe Taylor K1JT website.


Related publications