
2
September
2021
Installing XRDP Remote Desktop Server on Linux and Solving Connection Problems
16:05

Installing XRDP Remote Desktop Server on Linux and Solving Connection Problems

2 September 2021 16:05

This article describes how to set up a connection to Linux via RDP (Remote Desktop Protocol).

RDP is the most common protocol for remote work (or PC administration), in which the computer screen is displayed on a remote PC, controlled by mouse and keyboard. RDP can be used between PCs with different operating systems - both Windows and Linux.

The following guide was written based on the results of the successful installation and launch of an RDP server under Linux Runtu (Description: Ubuntu 20.04.3 LTS) and Linux Mint "Uma" Description: Linux Mint 20.2).

Installing and Configuring RDP on Linux

  1. If you have previously failed to configure xrdp, the first step is to remove the xrdp and xorgrdp packages and their settings to perform a clean slate installation.

    sudo apt-get purge xrdp xorgxrdp

  2. First you need to update the package versions:

    sudo apt-get update & sudo apt-get upgrade & sudo apt-get dist-upgrade

  3. If the operating system is Ubuntu Linux 16.04 or 18.04, or 20.04 or 21.04, I advise you to use a ready-made script from the site to install xrdp

    https://c-nergy.be/downloads/xRDP/xrdp-installer-1.4.zip- download the archive and extract the script.

Documentation for the "xrdp-installer" program is located at https://c-nergy.be/blog/?p=17810, and also in the program itself, brief information about the possible parameters for its call is displayed when you run the sh file with the --help key:

bash xrdp-installer-1.4.sh --help

To start, you do not need to enter the sudo command; when necessary, it will ask for the su password. Launch, for example, like this:

chmod +x xrdp-installer-1.4.sh
./xrdp-installer-1.4.sh

And then go to sections FINAL XRDP SETUP and "Diagnostics".


If the operating system is not one of those listed, the installation path is longer.

sudo apt-get install x-window-system xserver-xorg xserver-xorg-core
sudo apt-get install  xserver-xorg-legacy

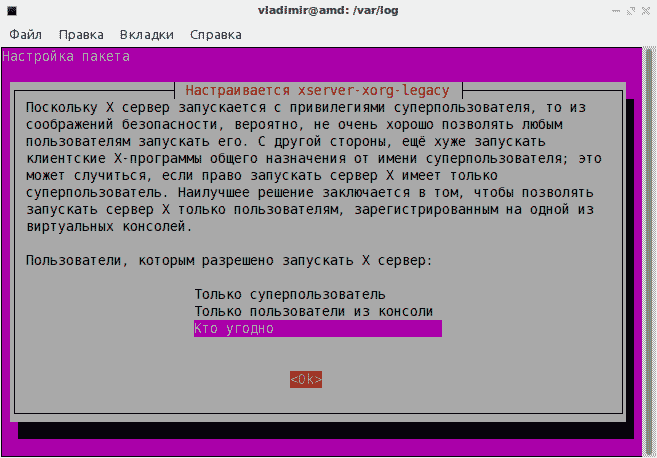
We reconfigure the package

sudo apt-get install xserver-xorg-legacy
sudo dpkg-reconfigure xserver-xorg-legacy

window for configuring Xorg launch:
xserver-xorg-legacy
in which I chose the last item that gives the greatest rights - “Anyone”.

This command writes to the cat /etc/X11/Xwrapper.config file:
allowed_users=anybody


Installing packages required to run xrdp:

sudo apt-get install libx11-dev libxfixes-dev libssl-dev libpam0g-dev libtool libjpeg-dev flex bison gettext autoconf libxml-parser-perl libfuse-dev xsltproc libxrandr-dev python3-libxml2 nasm fuse pkg-config git intltool checkinstall

Installing two main XRDP packages:

sudo apt-get install xrdp xorgxrdp xserver-xorg-input-all

You may notice that the installer will create an RSA key.
In order for the operating system to read this key, you need to add a user xrdp в группу ssl-cert:

sudo adduser xrdp ssl-cert

Then, you need to install the full MESA graphics subsystem and video card drivers. For what?
The point is that there is a chain:RDP client -> network -> Xrdp server -> Xsession -> Xorg -> MESA -> OpenGL Driver -> video card
If it is not possible to start the graphical mode, the RDP client will also “fall off” immediately after logging in.

sudo apt-get install libgl1-mesa-dri libglew1.5-dev libglew-dev libgles2-mesa-dev libglm-dev mesa-utils-extra mesa-common-dev freeglut3 freeglut3-dev

Finally, the video card must support OpenGL version 2.1 or higher and have a Linux driver installed.

  1. If the old computer is based on Interl 945 chipsets (under the general name i915), you need to install a modified, third-party driver, because On standard drivers, OpenGL 1.4 mode is enabled by default, while 2.1 is required. Otherwise there will be errors (see the "Errors" section below)

If the following command indicates that OpenGL is a high version, you don't need to do anything:

glxinfo | grep OpenGL

An example of a good driver version is 2.1 (pay attention to the OpenGL version string:
OpenGL vendor string: Mesa Project

OpenGL renderer string: i915 (chipset: 945G)

OpenGL version string: 2.1 Mesa 21.3.0-devel (git-dfef775 2021-09-02 focal-oibaf-ppa)

OpenGL shading language version string: 1.20

OpenGL extensions:

OpenGL ES profile version string: OpenGL ES 2.0 Mesa 21.3.0-devel (git-dfef775 2021-09-02 focal-oibaf-ppa)

OpenGL ES profile shading language version string: OpenGL ES GLSL ES 1.0.16

OpenGL ES profile extensions:

If version 1.4 is old, which is_notsuitable for XRDP, the command output glxinfo next:
OpenGL vendor string: Intel Open Source Technology Center

OpenGL renderer string: Mesa DRI Intel(R) 945G

OpenGL version string: 1.4 Mesa 21.0.3
OpenGL extensions:

OpenGL ES profile version string: OpenGL ES 2.0 Mesa 21.0.3

OpenGL ES profile shading language version string: OpenGL ES GLSL ES 1.0.16

OpenGL ES profile extensions:

Old version of the driver with support for OpenGL 1.4 (installed by default from the "xserver-xorg-video-intel" package). This version of OpenGL 1.4 is not suitable.

Install a new version of the driver (ONLY FOR OLD Integrated GRAPHICS CHIPSETS i915 - i925 - i945)

sudo add-apt-repository ppa:oibaf/graphics-drivers && sudo apt-get update && sudo apt-get upgrade && sudo apt-get dist-upgrade && sudo reboot

This command will update the graphics driver packages for integrated Intel graphics and reboot.

P.S. If you need to delete the PPA repository in the future, for example, after installing a new video card, the command to delete it is: sudo ppa-purge ppa:oibaf/graphics-drivers.

  1. Permission to connect to the X server "for everyone" - given earlier by the command sudo dpkg-reconfigure xserver-xorg-legacy
    The configuration is written to a file

    sudo ls -l /etc/X11/Xwrapper.config

If necessary, you can view its contents or edit it

sudo nano /etc/X11/Xwrapper.config

*Note console - Xorg is only accessible to console users, anybody is accessible to everyone. The default is console.
For more details see the command man Xwrapper.config.

  1. Setting up OpenGL graphics (required only for PCs with older chipsets with built-in i915 graphics):

Displaying the graphics adapter model:

lspci | grep VGA

If the graphics adapter is built-in Intel graphics chipset 915 or 82945G, go to the directory

cd /usr/share/X11/xorg.conf.d/

create a file 20-intel.conf

The 20-intel.conf file is needed only for Ubuntu <= 20.04 and integrated Intel graphics, and in Ubuntu >=22.04 and Linux Mint >=21 this file no longer needs to be created.

sudo nano 20-intel.conf

and add the text to it:

Section "Device"

        Identifier "Intel Graphics"

        Driver "intel"

        Option "TearFree" "true"

        Option "AccelMethod" "SNA"

        Option "BackingStore" "true"

        Option "DRI" "3"

EndSection

Option for older PCs: in the "AccelMethod" line, instead of the standard graphics acceleration method "SNA", specify "uxa".

ЛучIt's better to use "SNA" - a more modern method for x86 integrated graphics. Where uxa- previous architecture.

Save and exit Ctrl+O, Ctrl+X.

  1. Editing the XRDP configuration file:

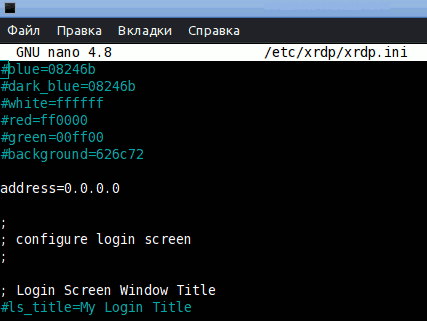
sudo nano /etc/xrdp/xrdp.ini

in the middle of the file after the line "background" add the default address for XRDP.
address=address=0.0.0.0
nastrojka_xrdp

Restarting the server:

sudo /etc/init.d/xrdp stop
sudo /etc/init.d/xrdp start

FINAL XRDP SETUP

  1. Add the user xrdp to the tty group and give rights to the serial port (to solve the problem of starting a Xorg session, that 'tty0 access denied')

    sudo usermod -a -G tty xrdp
    sudo chmod g+r /dev/tty0

  2. Allow the start of the "xrdp" service

    sudo systemctl start xrdp
    sudo systemctl enable xrdp

  3. IMPORTANT: Copy the script file to start the session and correct it

    cp /etc/X11/xinit/xinitrc ~/.xinitrc

Find out the type of installed desktop shell:

echo $XDG_CURRENT_DESKTOP

If the command output is empty, try

cat /etc/X11/default-display-manager

Editing the file ~/.xinitrc to start a session (session):

nano ~/.xinitrc

comment or delete the line /etc/X11/Xsession, instead we write:

exec startlxde

or

exec openbox-session

  • for Runtu OS

or

exec startxfce4

for Linux Mint with XFCE desktop shell

or

exec startlxqt

for Lubuntu or Linux Mint with LXQT desktop shell(if this is the output of the command

echo $XDG_CURRENT_DESKTOP).


So the file .xinitrc in the user's home directory, launched during the start of the XRDP session, took the following compact form:

#!/bin/sh

exec startlxqt

Note from 09/09/2021: You can add to this file the launch of any necessary programs, for example, launching the pulseaudio sound server and loading and switching the national keyboard layout. Then the file .xinitrc will take the form:

#!/bin/sh
pulseaudio &
setxkbmap -layout 'us,ru' -option 'grp:ctrl_shift_toggle,grp_led:scroll' &
exec startlxqt

Note from 10/07/2021: these commands must be added to the file ~/.xinitrc user who will connect via RDP.

Contents of the ~/.xinitrc file if the server OS is Linux Mint with the XFCE shell:

#!/bin/sh
pulseaudio &
setxkbmap -layout 'us,ru' -option 'grp:alt_shift_toggle,grp_led:scroll' &
exec startxfce4

When the server desktop is LXQT, my ~/.xinitrc file is as follows:
#!/bin/sh
pulseaudio &
setxkbmap -layout 'us,ru' -option 'grp:alt_shift_toggle,grp_led:scroll' &
exec startlxqt

And for OpenBox (Runtu Linux) the working version of the ~/.xinitrc file is as follows:
#!/bin/sh
pulseaudio &
setxkbmap -layout 'us,ru' -option 'grp:ctrl_shift_toggle,grp_led:scroll' &

exec openbox-session

exec startlxde

A universal ~/.xinitrc file for any desktop can be found on stackoverflow (slim installation required).

If we want to log in under an arbitrary user “user” - and not under the “xrdp” record

Editing ~/.xinitrc is impractical if there are several users, and the task is to connect via xrdp under any user.

It is much easier to fix the global (within the operating system) script for xrdp session configuration -
/etc/xrdp/startwm.sh, in which, instead of the last 2 lines, you can write - in the example for runtu LITE - after the word exec, call the corresponding session:

#test -x /etc/X11/Xsession && exec /etc/X11/Xsession
#exec /bin/sh /etc/X11/Xsession
exec openbox-session

Diagnostics

We reboot the PC that acts as a server.

We check from it that the Xorg server starts without errors:

sudo Xorg :10 -auth .Xauthority -config xrdp/xorg.conf -noreset -nolisten tcp

The screen may go blank at this point if you are testing XRDP from the same PC that is running the initial Xorg session. Need to click Ctrl+Alt+F1 enter your username and password using the command ps -aux | grep xrdp найти номер процесса "sudo xrdp" и завершить его командой "sudo kill <номер процесса>".

The text output of this command will contain the reason for the error.

If the message "(EE) Cannot establish any listening sockets - Make sure an X server isn't already running(EE)",
you need to restart the PC and repeat the diagnostics.

The second test option is that before connecting to the XRDP server for the first time, we end the current session “Start” - “Log out” - “Log off the system”. Since the RDP client will not be able to create a second session of the same user (with an error in the ~/.xorgxrdp.10.log file: "(EE) Caught signal 11 (Segmentation fault). Server aborting").

Or, you need to create a second user to test the connection to xRDP, which we will use to connect via the RDP protocol:

sudo useradd -m ivanov-rdp
passwd ivanov-rdp

xRDP server errors in Linux and their solutions

Setting up a firewall

If you cannot connect via RDP to the server, first of all check that the port is open on the FireWall on the server:

sudo apt install nmap
sudo nmap -Pn 192.168.55.100 -p 3389

where instead of 192.168.55.100 specify the IP address of the server on the local network
Don't forget to open local port 3389 in the firewall:

sudo ufw allow 3389

The conclusion should be as follows. If the port is open, everything is fine.
PORT STATE SERVICE
3389/tcp open ms-wbt-server

(If RDP port 3389 on the server has the state "open", and from the client it is visible as "filtered", see the end of the article - "If remmina cannot connect to the server").

Problem "When connecting from a client via RDP, a black blank screen is visible"

The package is not installed on the server xorgxrdp- a software “layer” between xorg and rdp server that displays graphics - Desktop, mouse pointer and icons.

The solution is to install the package on the server xorgxrdp:

sudo apt-get install xorgxrdp
sudo service xrdp restart

The xRDP session should now work. Let's try to connect!

Note: The package "xorgxrdp - Remote Desktop Protocol (RDP) modules for X.org" is included in most distributions Debian, as well as Ubuntu 18.04 "bionic", 20.04 LTS "focal", 21.04 "hirsute", 21.10 "impish", 22.04 LTS "jammy" (released 04/21/2022), and OS derivatives based on the Ubuntu DEB package base (such as Runtu, Lubuntu, Xubuntu, Kubuntu, etc.), as well as RPM-based distributions: Fedora, Arch, etc. Therefore, these instructions should work with many versions of Linux.

Problem when connecting via RDP, the desktop is different from the usual - the Gnome environment is used

Addition from 11/17/2023:

So that the current user can connect with the familiar environment, and not Gnome, create a file ~/.xsessionrc with content:

export GNOME_SHELL_SESSION_MODE=ubuntu
export XDG_CURRENT_DESKTOP=ubuntu:GNOME
export XDG_CONFIG_DIRS=/etc/xdg/xdg-ubuntu:/etc/xdg

At the end of the file /etc/xrdp/startwm.sh или ~/.xinitrc, the following should be written (using runtu LITE as an example):

#test -x /etc/X11/Xsession && exec /etc/X11/Xsession
#exec /bin/sh /etc/X11/Xsession
exec openbox-session


Remmina RDP Client - connecting to the server

sudo apt-get install remmina remmina-plugin-rdp remmina-plugin-secret
sudo reboot
remmina

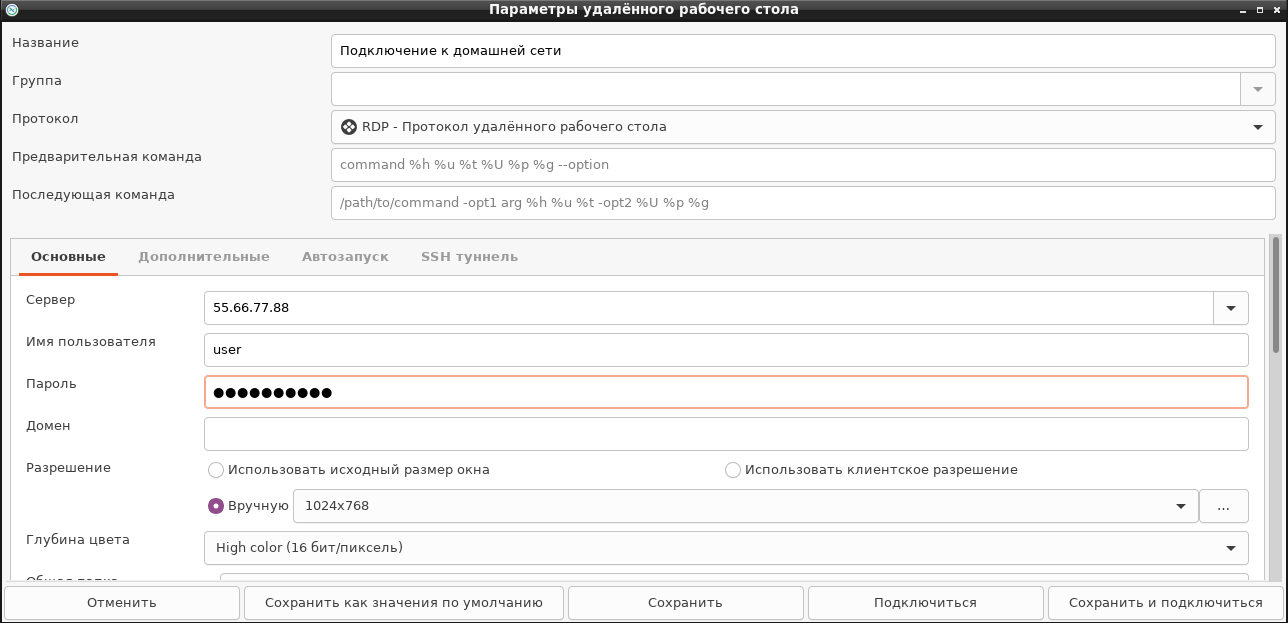
Add a connection - RDP type.
remmina

If VPN is not used, then enter the “white” IP address of your home router into the IP address.
When working via a VPN, the IP address refers to the internal (local, home) network.
The name and password are the same as when logging in “from the keyboard” on the server.

The bottom buttons of the Remmina window on netbooks with a screen resolution of 1024x600 pixels may be cut off and partially visible.
"Cancel" - "Save as defaults" - "Save" - "Connect" - "Save and connect"

Press the far right button "Save and connect".

Unable to connect to remote RDP server using Remmina after update

In May 2024, after a long break, the remmina client stopped connecting from Linux, while the standard mstsc.exe program was running on Windows, where RDP was working. Symptoms: port 3389 on the server is open, but from the client it is visible as filtered. This can be seen with the nmap server_ip_address command.

Explanation: The RDP port is half-open (filtered) if the client has an incorrect server certificate stored.

Solution: on the client open the file for editing ~/.config/freerdp/known_hosts2 и удалить из него строчку с IP-адресом сервера RDP. Либо можно полностью удалить данный файл ~/.config/freerdp/known_hosts2.

Various problems and their debugging

Error logs in the system directory /var/log/:

*xrdp.log

  • xrdp-sesman.log
  • Xorg.0.log, Xorg.10.log

Error logs in the user directory ~:

  • ~/.xorgxrdp.10.log

You can view them with the commands:

sudo cat /var/log/xrdp.log
sudo cat /var/log/xrdp-sesman.log
sudo cat /var/log/Xorg.0.log
sudo cat /var/log/Xorg.10.log
sudo cat ~/.xorgxrdp.log

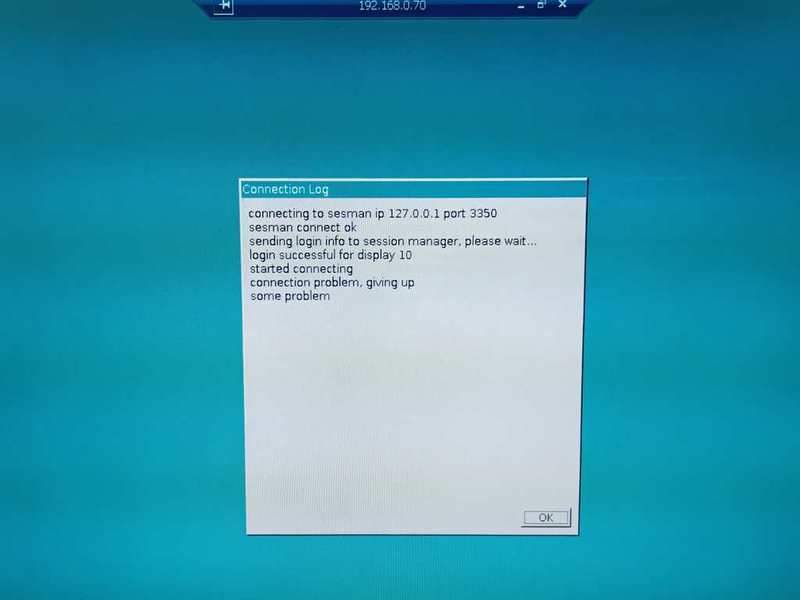
If you connect from a Windows PC to a Linux PC after entering your username and password, you see a blue-green solid background with no text or icons,
or there are numerous errors in the XRDP.LOG file, which means the connection was made, but Xorg graphics did not start - most likely due to an old version of OpenGL, or rights, see above.

An example of a client-side error when trying to connect using the MSTSC.EXE program:
blue

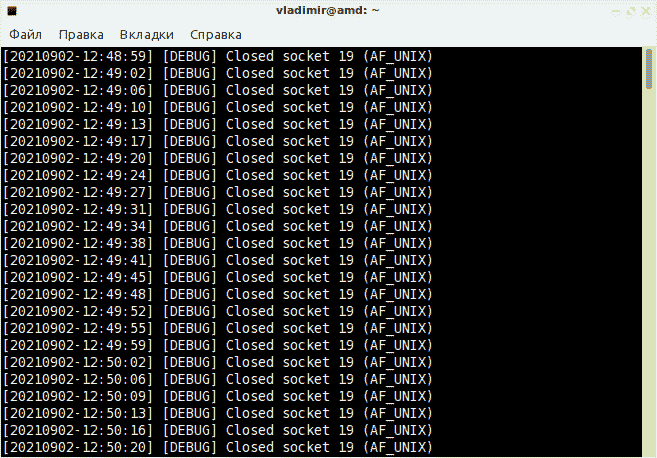
Error messages in the XRDP.LOG log on the server side:
error19
or similar [DEBUG] Closed socket 17 (AF_UNIX)

The solution is diagnostics using the command from the desktop of the server machine:

sudo Xorg :10 -auth .Xauthority -config xrdp/xorg.conf -noreset -nolisten tcp

You need to ensure that there are no Xorg errors in the /var/log/Xorg.10.log file.

If, when connecting from a PC running Windows, you see a black screen for a moment, which immediately closes, one of the options is:
*invalid username/password

  • incorrect ~/.xinitrc script (desktop session did not start). Check your ~/.xinitrc file or /etc/xrdp/startwm.sh for the presence of a team exec .
  • the user you are connecting to the PC remotely has an open session in the operating system locally (is currently using the computer).

Security

Now any PC on the local network will be able to connect to your computer using the RDP protocol. Must be set for user account complex password. If you connect to your PC from the Internet, you can additionally use a VPN with traffic encryption.

Addition from 05/30/2024:

If you are not using older clients, you can upgrade the version of the SSL protocol that RDP negotiation uses:

sudo nano  /etc/xrdp/xrdp.ini

Correct the line

ssl_protocols=TLSv1, TLSv1.1, TLSv1.2, TLSv1.3

on

ssl_protocols=TLSv1.2, TLSv1.3

and restart the service by re-reading the configuration file:

sudo service xrdp reload

Using an alternative FreeRDP client instead of Remmina

Installing the Remote Desktop Program FreeRDP:

sudo flatpak install com.freerdp.FreeRDP

Launching the FreeRDP client to connect to the server (for example, 192.168.1.100):

flatpak run com.freerdp.FreeRDP /u:username /p:P!@##word /w:1200 /h:700 /v:192.168.1.100

Benefits FreeRDP- the ability to call from the command line or a batch file, the program is actively developing. Website:https://www.freerdp.com/.


Last edit date 05/30/2024


Related publications