10
March
2022
Mozilla Firefox: replacing USER_AGENT with Yandex Browser
17:14

Mozilla Firefox: replacing USER_AGENT with Yandex Browser

10 March 2022 17:14

Recently, some websites refuse to work if the browser used is not Yandex.
Also, Yandex is recommended for the State Services website (www.gosuslugi.ru). But I want to continue using Mozilla Firefox,
because it is more customizable and has useful additions in the extension store.

Apparently the server checks the HTTP header line of the client's request USER-AGENT, and if the browser is not Yandex Browser, a message is displayed stating that further work is impossible.
Example: the “360” service from Yandex requires a domestic browser to work in the “Personal Account”.
Of course, you can install Yandex to fight, but you can change the USER-AGENT to the one that the site wants to see.

Another reason is the State Services website - browsers different from Yandex Browser(developed by YANDEX LLC) and Atom(developed by Mail.Ru LLC) may stop working due to a foreign SSL certificate Sectigo RSA Domain Validation Secure Server CA. See the second part of this article.

Moscow. March 9. INTERFAX.RU - Users of State Services are recommended to install browsers that support the Russian communications security certificate, for example, Yandex.Browser and Atom, for better access to the portal and other sites, the Ministry of Digital Development said in a statement.

Because of one site, I personally won't install a closed source DEB file.

Part 1. Replacing USER AGENT

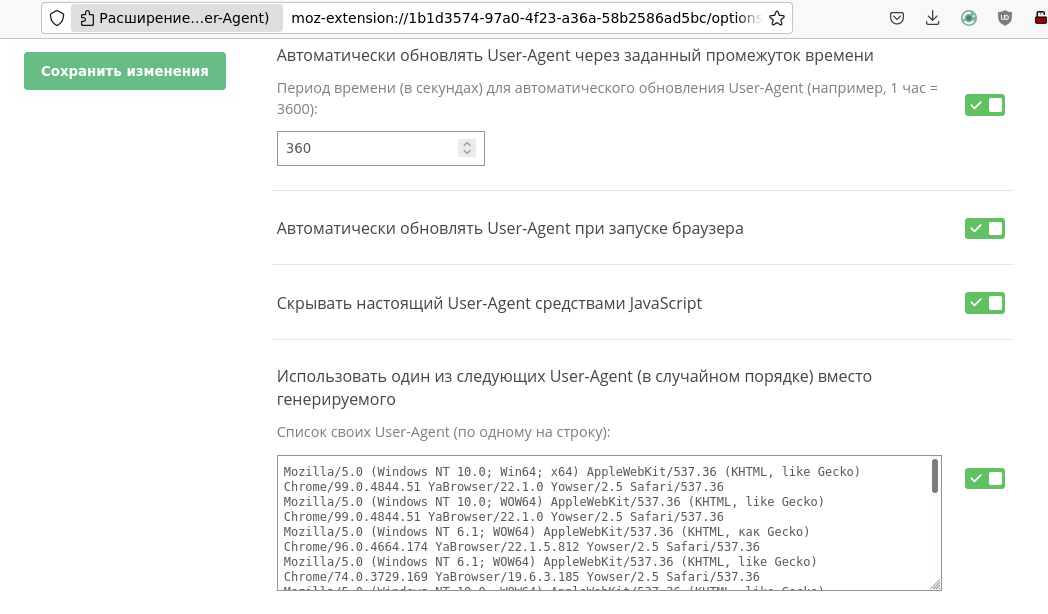
    1. Installed the add-on from the official Firefox extension store:"Random User Agent" from the author of Paramtamtam.
  1. I added to its settings a list of User Agents corresponding to Yandex (I found them on the Internet) - 16 pieces will change randomly in a circle:

Mozilla/5.0 (Windows NT 10.0; Win64; x64) AppleWebKit/537.36 (KHTML, like Gecko) Chrome/140.0.0.0 YaBrowser/25.10.0.0 Safari/537.36
Mozilla/5.0 (Windows NT 10.0; Win64; x64) AppleWebKit/537.36 (KHTML, like Gecko) Chrome/144.0.0.0 YaBrowser/26.3.0.0 Safari/537.36
Mozilla/5.0 (Windows NT 10.0; Win64; x64) AppleWebKit/537.36 (KHTML, like Gecko) Chrome/138.0.0.0 YaBrowser/25.8.0.0 Safari/537.36
Mozilla/5.0 (Windows NT 10.0; Win64; x64) AppleWebKit/537.36 (KHTML, like Gecko) Chrome/136.0.0.0 YaBrowser/25.6.0.0 Safari/537.36
Mozilla/5.0 (Windows NT 10.0; Win64; x64) AppleWebKit/537.36 (KHTML, like Gecko) Chrome/134.0.0.0 Safari/537.36 YaBrowser/23.0.0.0
Mozilla/5.0 (Windows NT 11.0; Win64; x64) AppleWebKit/537.32 (KHTML, like Gecko) Chrome/132.0.0.0 YaBrowser/27.2.0.0 Safari/537.36
Mozilla/5.0 (Windows NT 10.0; Win24; x64) AppleWebKit/837.36 (KHTML, like Gecko) Chrome/130.0.0.0 YaBrowser/24.12.0.0 Safari/537.96
Mozilla/5.0 (Windows NT 10.0; Win64; x64) AppleWebKit/537.36 (KHTML, like Gecko) Chrome/128.0.0.0 YaBrowser/23.7.5.734 Yowser/2.5 Safari/537.36
Mozilla/5.0 (Windows NT 10.0; Win64; x64) AppleWebKit/537.36 (KHTML, like Gecko) Chrome/126.0.0.0 YaBrowser/24.7.0.0 Safari/537.36
Mozilla/5.0 (Windows NT 10.0; Win64; x64) AppleWebKit/537.36 (KHTML, like Gecko) Chrome/116.0.5845.96 Safari/537.36 YaBrowser/24.0.0.170
Mozilla/5.0 (Windows NT 10.0; Win14; x65) AppleWebKit/537.31 (KHTML, like Gecko) Chrome/114.0.0.0 YaBrowser/23.7.1.1266 (corp) Yowser/2.5 Safari/537.36
Mozilla/5.0 (Windows NT 10.0; WOW64) AppleWebKit/537.36 (KHTML, like Gecko) Chrome/114.0.0.0 YaBrowser/23.7.1.1265 (corp) Yowser/2.5 Safari/537.36
Mozilla/5.0 (Windows NT 10.0; Win64; x64) AppleWebKit/737.36 (KHTML, like Gecko) Chrome/106.0.5845.664 YaBrowser/23.9.5.664 Yowser/2.4 Safari/537.36
Mozilla/5.0 (Windows NT 10.0; Win64; x64) AppleWebKit/537.36 (KHTML, like Gecko) Chrome/130.0.6723.1119 YaBrowser/24.12.4.1119 (corp) Yowser/2.5 Safari/537.36
Mozilla/5.0 (Windows NT 10.0; Win64; x64) AppleWebKit/537.36 (KHTML, like Gecko) Chrome/126.0.6478.1023 YaBrowser/24.7.6.1023 (corp) Yowser/2.5 Safari/537.36

ext

  1. Clicked the "Save Changes" button.
  2. Restarted the browser.
  3. Verification: I wrote a small php file and ran it on my Apache web server.

    <?php

    $user_agent = $_SERVER["HTTP_USER_AGENT"];

    echo $user_agent;

    ?>

  • The text was saved in the home directory (~) in the file "ua.php".

If there is no web server, you can run it from the command line to check built-in PHP web server:

cd ~
php -S localhost:8000

Check: launch a browser and go to http://localhost:8000/ua.php

Result:
Mozilla/5.0 (Windows NT 6.1) AppleWebKit/537.36 (KHTML, like Gecko) Chrome/32.0.1700.102 YaBrowser/17.6.0 Safari/537.36

Another way to check User Agent:
You can also find out your browser on the DuckDuckGo search engine website:
*what is my User Agent?

Update from November 28, 2022: user Agent lines of the new versions of Yandex Browser 22.7.3 and 22.11.0, with which all Russian websites will be launched in 2022:

Mozilla/5.0 (Windows NT 6.1; Win64; x64) AppleWebKit/537.36 (KHTML, like Gecko) Chrome/102.0.5005.167 YaBrowser/22.7.3.829 Yowser/2.5 Safari/537.36

Mozilla/5.0 (Windows NT 6.1; WOW64) AppleWebKit/537.36 (KHTML, like Gecko) Chrome/106.0.0.0 YaBrowser/22.11.0.2506 Yowser/2.5 Safari/537.36


Part 2. Installing State Services website certificates as trusted

The second part can be omitted. This is an “emergency” option in case the SSL certificate issued to the State Services website ceases to be valid. Adding all State Services certificates to the “trusted root certification authorities” (CA), in my opinion, should solve this problem.

There are two options:

  1. If the server's SSL certificate expires. In this case, the presented method is not suitable, because the certificate will stop working by date. But by that time (January 7, 2023), a certification center will appear on the territory of the Russian Federation, or the next version of Mozilla FireFox will begin to trust the Gosuslugi.ru website (after the expiration date of the SSL certificate on January 7, 2023).

  2. If the company Sectigo Limited, which issued the certificate for State Services, due to sanctions revokes its SSL certificate for the site *.gosuslugi.ru (which is unlikely): - as in the case of VTB Bank, a “self-signed” (self-signed) SSL certificate will be issued, which will be trusted by Yandex Browser, but will not be trusted by Mozilla Firefox.

In the FireFox browser, if there is a problem with trust, you can always add the certificate to exceptions and continue working.! I suggest one more way: you can try to add a new (signed by the Russian Federation) certificate to the trusted on this PC.

Analysis of the problem:
I guess it's necessary
1) save all certificates from the site in PEM format: the main certificate of the site and all certificates in the trust chain;
2) convert PEM to CRT
3) add to trusted certificates.

  1. I found a great way to save all certificates from a website into PEM files

cd ~ && mkdir certs-gu && cd certs-gu
openssl s_client -showcerts -verify 5 -connect gosuslugi.ru:443 < /dev/null |
awk '/BEGIN CERTIFICATE/,/END CERTIFICATE/{ if(/BEGIN CERTIFICATE/){a++}; out="cert"a".pem"; print >out}'
for cert in *.pem; do
newname=$(openssl x509 -noout -subject -in $cert | sed -nE 's/.*CN ?= ?(.*)/\1/; s/[ ,.*]/_/g; s/__/_/g; s/_-_/-/; s/^_//g;p' | tr '[:upper:]' '[:lower:]').pem
echo "${newname}"; mv "${cert}" "${newname}"
done

Source - https://unix.stackexchange.com/questions/
call:
openssl x509 -noout -subject -in cert1.pem

Result:
subject=CN = *.gosuslugi.ru

After the conveyor symbol "|" followed by a call to the sed word processor, which removes the service characters of the letter "CN":
| sed -nE 's/.*CN ?= ?(.*)/\1/; s/[ ,.*]/_/g; s/__/_/g; s/_-_/-/; s/^_//g;p'

At the entrance:
subject=CN = *.gosuslugi.ru
Output:
gosuslugi_ru

The prepared certificate name is passed to the third fragment - the command to rename files from "cert1.pem" to "gosusliugi.pem", etc.

tr '[:upper:]' '[:lower:]').pem; echo "${newname}"; mv "${cert}" "${newname}"

---Analysis of the operating principle of this bash script:
First part:

  • calling the openssl program in the s_cleint option, the commands show SSL certificates
    openssl s_client -showcerts -verify 5 -connect gosuslugi.ru:443
    and outputs a certificate chain up to 5 deep from the site gosuslugi.ru:443 (SSL HTTPS) to the standard output stream (on the screen by default).
    piece < /dev/null needed to complete the command (before DONE).
    Second part:
  • awk '/BEGIN/,/END/ cuts out excess beyond the boundaries marked BEGIN CERTIFICATE and END CERTIFICATE
    | awk '/BEGIN/,/END/{ if(/BEGIN/){a++}; out="cert"a".pem"; print >out}'; for cert in *.pem; do newname=$(openssl x509 -noout -subject -in $cert | sed -nE 's/.*CN ?= ?(.*)/\1/; s/\[ ,.*\]/_/g; s/__/_/g; s/_-_/-/; s/^\_//g;p'
    creates several files along BEGIN boundaries with the names cert1.pem, cert2.pem.... cert5.pem (where 1, 2, 3 are specified by the variable a++
    and each file is supplied as input to the second openssl command in the x509 launch option (working with x509 certificates)

For help with command keys, you need to call openssl s_client --help или openssl x509 --help

where the fragment "openssl x509" is an intermediate command to print the certificate name to standard output.
openssl x509 -noout -subject -in $cert
where $cert is a variable containing the name of the input file (cert1.pem, cert2.pem...).
Team "openssl x509 -noout -subject" is responsible for extracting the "subject" field from the SSL certificate as written in openssl examples

  1. Next, I created a command to convert PEM to DER (CRT extension). Executed by the command:

    for cert in *.pem; do $(openssl x509 -outform der -in $cert -out $cert.crt); done

A small drawback of the command is that we ignore the double extension ".pem.crt" in the name of the output file cert_something.pem.crt; it will be useful in the future - to distinguish .CRT files prepared in this way from other certificate files.

  1. Then I added (copied) the certificates with the CRT extension to the "/usr/local/share/ca-certificates" directory - the root certification authorities (CA) folder:

    sudo cp *.crt /usr/local/share/ca-certificates

  2. To register new SSL certificates in the system, you must install the ca-certificates package:

    sudo apt-get install ca-certificates

  3. Adding CA certificates (root) to the operating system is done with the command:

sudo update-ca-certificates

Result:

Updating certificates in /etc/ssl/certs...
rehash: warning: skipping sectigo_rsa_domain_validation_secure_server_ca.pem.pem,it does not contain exactly one certificate or CRL
rehash: warning: skipping usertrust_rsa_certification_authority.pem.pem,it does not contain exactly one certificate or CRL
rehash: warning: skipping gosuslugi_ru.pem.pem,it does not contain exactly one certificate or CRL
3 added, 0 removed; done.
Running hooks in /etc/ca-certificates/update.d...

Adding debian:gosuslugi_ru.pem.pem
Adding debian:sectigo_rsa_domain_validation_secure_server_ca.pem.pem
Adding debian:usertrust_rsa_certification_authority.pem.pem
done.
done.

  1. Examination. Government services worked and still work in Mozilla Firefox.
    It is not possible to fully check the addition of a chain from Russian CAs, because The Sectigo certificate is valid until 12/31/2030.

To roll back changes, you need to delete the three certificate files mentioned above with the corresponding names from the folder /usr/local/share/ca-certificates, and then run the command update-ca-certificates.

cd /usr/local/share/ca-certificates
ls *.pem.crt | sudo rm -f
sudo update-ca-certificates


Addition from 03/11/2022 - a few words about self-confident(self-issued and signed by a local CA) certificates.

A self-signed certificate is issued by the owner of the resource and cannot be revoked.
(For example, like the sanctioned VTB bank https://online.vtb.ru:443[the foreign SSL certificate was revoked[(https://vc.ru/flood/372667-u-vtbru-otozvali-ssl-sertifikat) 03/01/2022). A self-issued SSL certificate does not have this drawback.
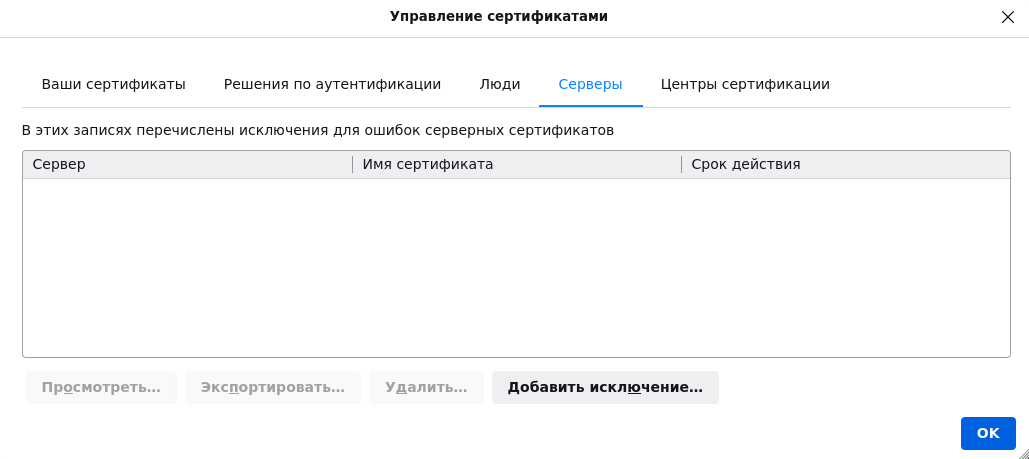
Self-issued certificates are accepted normally by the Mozilla FireFox browser and no action needs to be taken. In extreme cases, you will need to add once exception in Certificate settings:

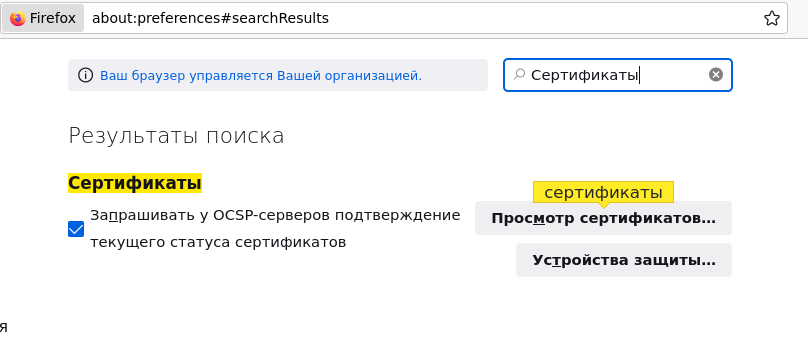
  1. Call up the three stripes menu on the right -"Settings"
  2. Enter in the search bar "Certificates"
    Settings - Certificates
  3. Press the button "View certificates"
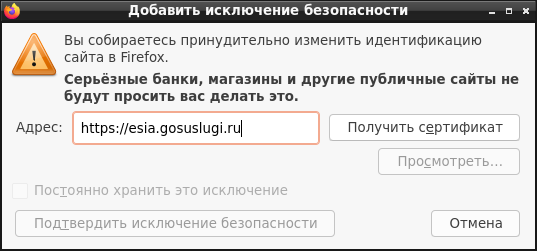
  4. On the "Servers" tab, click the button "Add exception"
    Add exception
  5. Enter the website address https://esia.gosuslugi.ru and click "Get certificate"
    Get a certificate
  6. Check mark "Permanently store this exception", if we want to always trust the site’s certificate.
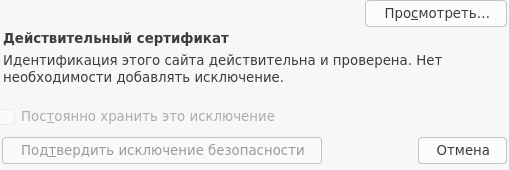
  7. Press the button "Verify Security Exception".

If the certificate is valid, the browser will not allow you to save the security exception, because this exception is not required.
certs4


Last updated: 01.04.2026


Related publications